1: Login to the site, and you should see the WordPress Dashboard. I am using the Horncastle Royal British Legion website as the basis for this tutorial, but your view will differ slightly.

2: On the left is the Dashboard menu. Click Posts and then Add New
3: This will present you with the new post page, made up of four parts – block editor menu, block editor Title, block editor Content and document/block settings
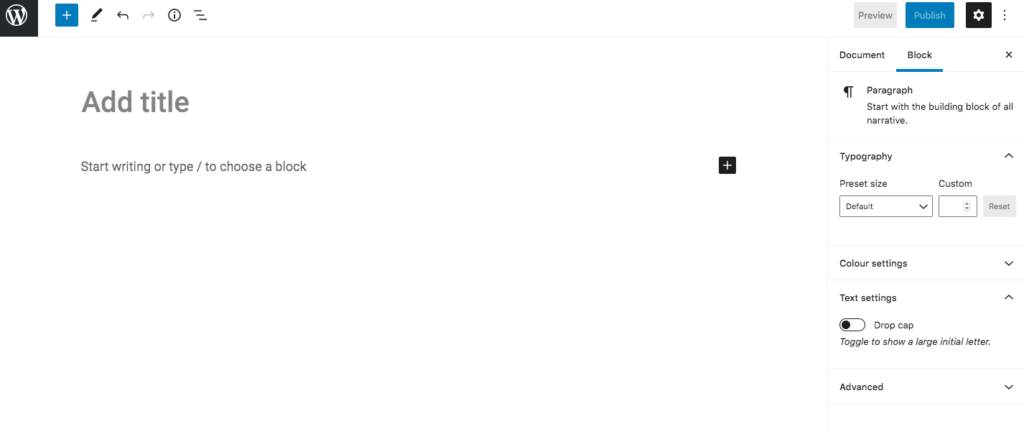
4: Start by adding a Title – click where it says Add title. When you have typed a title, an ‘eye’ appears, this is to enable/disable the Post Title being displayed when published. Most of the time it should be enabled. In the block editor menu on the right are options to Save draft, Preview, Publish. Save draft often, as should there be any issues with the local computer or website server the content will probably disappear. Type ‘Title of the Post’
5: Below the title is the main content area, where the body of your post is created. If you click where it says start writing, a + symbol appears on the right. This is for adding various blocks, but for the purpose of this basic tutorial, we will be using only two blocks Heading and Paragraph. Click the +, and select Heading – type ‘Introduction’, press Enter.
6: When pressing Enter, the editor creates a new block automatically, which can be changed by pressing +, but by default it is the Paragraph block so you can just type – ‘This is a block of text to show that the block editor creates paragraph blocks by default, when you press ENTER. If you don’t want to create a new paragraph, but start on a new line, then press SHIFT-ENTER.
And the text will then continue on a new line until you press ENTER.’
7: Repeating steps 5 & 6 will enable you to creat a basic text based post, for example a newsletter. When you click on any text that you have already created, a toolbar will appear above the current block, allowing changes to the text in that block that are highlighted.
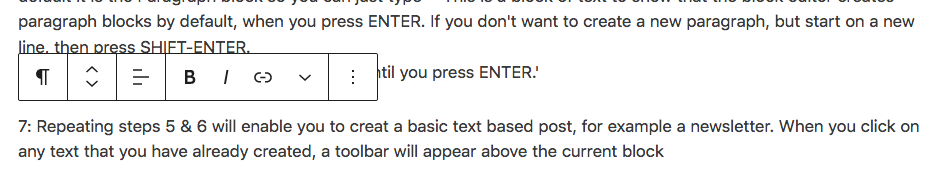
So if we wanted to create a line saying ‘Creating BOLD text, text in italics or linking to a website can be very quickly created using the block toolbar.’, you would highlight the word BOLD, and select B from the block toolbar, italics by highlighting italics and pressing I.
Links are created by highlighting the word that you want to be the link, WEBSITE, click the link icon in the menu, type the website address into the box that appears, click open in new tab, and then click the submit symbol.

8: On the right side is a settings box, that changes depending on whether the post or a block within the post is selected. If the Headline block is selected there are options for Typography and Colour Settings. The Paragraph block has an extra option for Text settings, called Drop cap, which allows the first letter in the paragraph to be larger than the rest. These options apply to the whole block, so changing the colour of a block changes the colour of the text for that whole block (but not the rest of the page).
9. The Document settings allow the Post visibility to be set, to choose when the post should be published etc. For this tutorial we are only interested in Permalink and Categories.
Permalink is the text displayed in the website address bar (the URL-slug) for that page, so in the case of this post it is ‘how-to-write-a-basic-post’. This should match the post title, unless you decided to change either the title or permalink. An example would be if you created a post, then added to it a week later, and put UPDATED in the title. If the page has already been shared to other websites etc then you wouldn’t want the perma-link to include UPDATED, as it would change the page location.
Categories are for separating Posts, so that visitors can go directly to the section that interests them, without having to scroll through possibly hundreds of posts to get there. In the case of HorncastleRBL we only have three categories – Uncategorised, News, Magazine. Uncategorised is the default for most WordPress installs and cannot be removed. If you forget to set a category, WordPress will put it in Uncategorised, until you change it.
10: Once you are satisfied, click Publish. If after publishing you notice errors, then you can go to the post via the WordPress Dashboard, or if already logged in, Edit Post appears in the menu at the top of the page.